

One week until our first day of school! I'm eager to see all those sweet faces in my classroom. Not to mention school supplies! I LOVE new school supplies!
In fact, this is one of my favorite movie quotes of all time...

But to get to the fun stuff, we have to get those classrooms unpacked and organized and sit through hours of less-than-exciting meetings. Because our special ed team (autism, speech, & "regular" special ed) doesn't want to be one more dull, obligatory meeting in the queue, we work hard to prepare an efficient way to train for our inclusion teachers. It is important to provide enough student information to inclusion teachers and special areas teachers (art, music, & PE) while not overwhelming them before they have faces attached to names. So, our usual plan is to go through the following sequence a few days before our "Meet the Teacher" event and then follow up at the end of the first week of school to provide more in-depth information.
Here are the topics we cover during this training:
- Welcome and thank inclusion teachers for taking on the challenges and joys of providing a high expectations, accommodating, inclusive classroom.
- Each special ed teacher rotates through the grade level groups and reviews each student's special ed eligibility, behavioral, academic, and language accommodations, schedule of services, any outside services that they will receive (OT, VI, AI, PT), the student's BIP (behavioral improvement plan), special tools/visuals that will be provided for each student in the classroom (such as adaptive seating, headphones, technology, visual tools, timers, calming areas), as well as requesting particular scheduling accommodations (e.g. making sure writing is right after recess to allow for maximum focus or making sure to align math time with another classroom to allow us to pull multiple students for resource group).
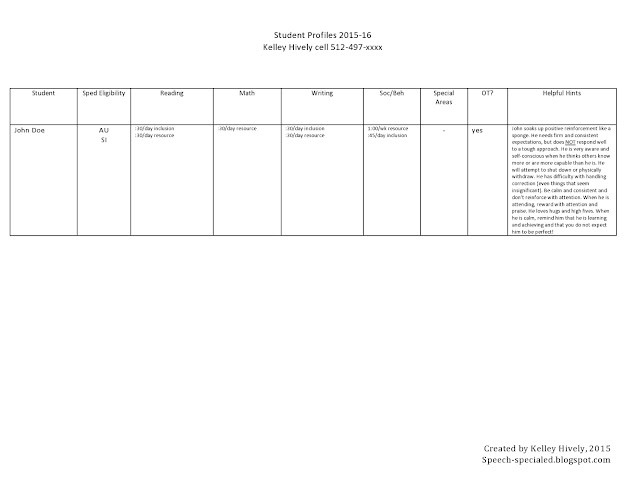
- In addition to the IEP, I provide a student profile sheet. This is a quick reference for teachers to identify accommodations, testing requirements, service time, as well as notes related to behavior that will be helpful in day-to-day situations, but may not be explicitly stated in the IEP (click on the example to download the template for your own use).
- We review the purpose of resource time. Resource (pull-out) is prescriptive in nature and not comprehensive instruction in the subject area. Because our time is limited and it is prescriptive, we focus on quality over quantity. The student may not produce as many products as classroom peers. Grades need to be adjusted accordingly.
- We discuss each teacher's particular preference for how inclusion support is provided. Do you like us to be interactive or quiet? Some teachers love to have a partner to jump in when a lesson is not working while it throws others off their game. I like to know a teacher's preference and not have to guess!
- We discuss the type of information that needs to be shared with special ed in case we're not aware (changes in the family, health concerns, behavioral changes, slipping grades, tardies, tools/strategies that they see are making a positive impact--or not!). We also discuss when to text or call us directly during the day. I emphasize that if they notice one of my students "ramping up" or fading behaviorally, I would much rather be texted early on so I can try to get the train back on the track before it derails completely. It is much easier to head off problems before aggression occurs while using those moments to help students practice strategies for dealing with frustration, anger, fatigue, or anxiety.
- We discuss our expectations for teachers in Admission Review Dismissal (IEP) meetings: bring student portfolio with work samples, current data, specific & positively phrased examples of progress or lack of progress, specific examples of the ways supports and interventions are being provided. We discuss what you legally can & can't say in ARD meetings (do NOT tell a parent their child they NEEDS MEDS! Or that you believe they have Purple People Eater Syndrome! You are not a doctor or a diagnostician!). We emphasize the use of "sandwich" comments when needing to address a difficult topic: positive-difficulty-positive.
- Finally, Orlanda and I like to meet directly with the inclusion teachers of students who take part in our social thinking groups to explain the social thinking terms teachers will likely hear us and students use during the year and encourage them to incorporate the terminology into classroom lexicon to aid in generalization. The handout below is a useful reference tool. We cover Whole Body Listening, Expected/Unexpected behavior, Thinking with your Eyes, Brain in the Group, Size of the Problem, the use of 5 point scales and Get Ready-Do-Done charts, and how to use thought bubbles in the classroom. Click on the image below to download for your use.

We've found that training our inclusion teachers in this manner is most efficient given the short amount of time we have for prep before school begins and yet doesn't overwhelm our teachers with too much information before they have a framework for each student. Our teachers have told us they feel ready to start on Monday informed and prepared.
How do you prepare your inclusion teams for a new school year? Share in the comments below so we can learn from each other!
And Happy New School Year!


.jpeg)
.jpeg)


.jpeg)


